Add Row
Add Element
cleaners edge logo
update

Cleaners Edge

From Van to Victory - Helping Pros Clean Up
update
Add Element
  • Home
  • Categories
    • Business & Marketing
    • Technical Skills & How-To
    • Equipment & Product Reviews
    • Industry News & Events
    • Operator Success Stories
    • Training & Certification
    • Business Tools & Technology
    • Consumer Education
  • Profiles
September 14.2025
2 Minutes Read

Stinky Vacuum? Here’s How to Keep It Fresh and Odor-Free!

Dusty vacuum filter held in hands for stinky vacuum solutions.

Understanding the Causes of a Stinky Vacuum

Have you ever noticed a foul smell coming from your vacuum cleaner during or after use? This common issue usually stems from trapped dirt, hair, or even food particles lingering in the machine. Over time, if these residues aren't addressed, they can start to decay, producing unpleasant odors that fill your home each time you clean.

Easy Steps to Eliminate Odors

Fortunately, there are simple steps you can follow to restore your vacuum's freshness:

  • Empty the Dustbin: Regularly emptying and cleaning the dustbin is a crucial first step. Make sure to do this after each use to prevent buildup.
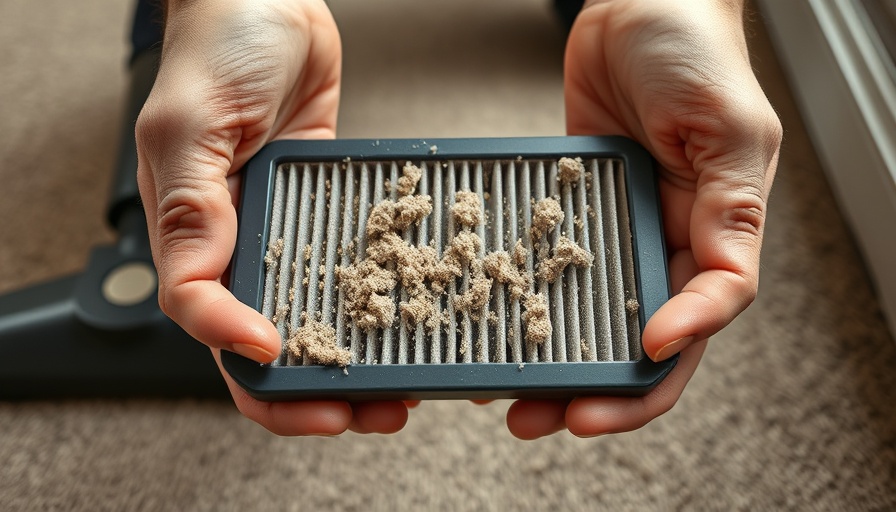
  • Clean Filters: Most vacuums come with washable filters. Rinse them according to the manufacturer's guidelines. This minimizes odors and helps maintain suction power.
  • Inspect Hoses and Brushes: Hair and debris can get tangled in the hoses and brushes. Take a few minutes to clear these areas to ensure proper airflow and functionality.
  • Use Odor-Eliminating Sprays: Consider using products designed to eliminate odors safely. You can find sprays made specifically for vacuum cleaners.

When to Seek Professional Help

If your vacuum still smells bad after following these steps, it might be time to consult a professional. There could be deeper issues, such as clogs within the motor that need expert attention.

The Importance of Regular Maintenance

Keeping your vacuum clean is essential. Not only does it improve the appliance's performance, but it also creates a healthier home environment. A well-maintained vacuum can effectively remove allergens and dust, ensuring that your living space remains fresh and clean.

Conclusion: A Stinky Vacuum Doesn't Have to Ruin Your Day

With these tips and techniques, you can keep your vacuum smelling fresh and working efficiently. Regular maintenance can save you time, money, and hassle in the long run!

Technical Skills & How-To

16 Views

0 Comments

Write A Comment

*
*
Related Posts All Posts
01.06.2026

Expert Tips to Clean Cat Urine from Carpets and Prevent Odors

Update Understanding the Challenge of Cat Urine Cleanup Cat urine can be one of the most challenging messes for pet owners to tackle. Not only does it leave behind a stubborn stain, but its strong odor can linger long after the accident has been cleaned. For responsible cat owners, knowing how to cleanse carpets of these unpleasant mishaps is essential for maintaining a healthy and inviting home. Essential Steps for Effective Cleaning The first step to successfully cleaning cat urine is to act quickly. According to experts, blotting up as much of the liquid as possible with paper towels or an absorbent cloth is critical. Covering the area with a towel and standing on it can help soak up excess moisture. This initial act can make a significant difference, reducing the possibility of the stain setting in. Once the area has been blotted, it’s time to use a cleaning solution. Professional recommendations suggest mixing a few drops of dish detergent with water and applying it to the stained area. Letting this mixture sit for an hour or two can help lift the stain while minimizing the need for vigorous scrubbing, which might damage carpet fibers. DIY Solutions You Can Trust For those looking to avoid harsh chemicals, DIY cleaners are a fantastic and cost-effective solution. A simple mix of vinegar and baking soda has shown effective results. After soaking up as much urine as possible, sprinkle the affected area with baking soda and then spray it with a vinegar and water solution. When the vinegar reacts with the baking soda, it fizzles, breaking down the stain and the odors. Moreover, if the smell persists, applying an enzymatic cleaner is essential. These cleaners work at a molecular level, breaking down the components responsible for the odor. Remember, patience is key: allow the cleaner to sit for the recommended time before drying the area thoroughly. Looking Ahead: Prevention and Maintenance Once the area is clean, it’s vital to monitor the spot. Even with thorough cleanup, residual odors can cause your cat to revisit the area, reinforcing undesirable behavior. Placing a black light over the area after it dries can help identify any urine crystals that remain; these may not be visible to the naked eye but could still be releasing odors. Ensuring your cat is healthy and happy is crucial, too. Changes in urination habits might indicate health issues, so consulting with your vet if problems persist is always wise. Prevention is just as important as cleanup. Providing your cat with the right nutrition and a comfortable litter area can decrease the likelihood of accidents. Tools and Resources for Cat Owners Equipping yourself with the right tools can simplify the cleaning process significantly. From enzymatic cleaners specifically designed for pet accidents to DIY solutions made from household ingredients like vinegar and baking soda, options abound. Setting up a pet-friendly cleaning kit will ensure you’re always ready to tackle any accidents. Final Thoughts: Taking Action on a Cat Mess Being a cat owner means being prepared for a few messes along the way. By knowing how to effectively clean cat urine from your carpets, you can maintain a cleaner home and a happier pet. Remember that taking swift action, having the right tools, and ensuring your pet's well-being are all crucial to preventing and managing mishaps. With these tips, you're now better equipped to manage any accidents and uphold a warm, welcoming environment for both your cat and yourself!

12.26.2025

Cleaning an Olefin Carpet? Quick Tips to Avoid Damage

If you’re looking to elevate your entire approach to home or office cleanliness, consider how a well-structured cleaning routine can impact not just your carpets, but the overall health and comfort of

12.16.2025

Discover the Best Ways to Clean Your Humidifier Efficiently!

Update Why Cleaning Your Humidifier is Essential Humidifiers are more than just comfort tools; they significantly enhance the quality of the air we breathe, especially during dry seasons. However, without regular cleaning, they can become a breeding ground for bacteria and mold. When you turn on a dirty humidifier, instead of introducing well-humidified air into your space, you may as well be unleashing a cloud of harmful microorganisms. The Basics of Humidifier Maintenance According to the experts, maintenance is crucial, yet straightforward. Weekly cleaning should become part of your routine. This not only keeps your humidifier operating effectively but also extends its lifespan. The Environmental Protection Agency (EPA) recommends cleaning every three days, particularly if you're using the humidifier daily. Daily Care Practices for Humidifiers To minimize buildup, start by emptying and air-drying your humidifier after each use. This simple practice can significantly reduce the growth of bacteria and mold. If you consistently use distilled water, you’ll limit the minerals that can accumulate, further preventing those pesky deposits that can clog your humidifier. Weekly Cleaning Steps Made Simple Grab your supplies: distilled white vinegar or citric acid, a sponge for scrubbing, and a soft-bristle brush. Disassemble your humidifier, ensuring you follow any specific guidance in your user manual. Soak the removable parts in a vinegar mixture for about 30 minutes, scrubbing diligently to remove any limescale, and then rinse thoroughly. For stubborn stains, applying vinegar directly can help break down the buildup. When to Deep Clean Your Humidifier Despite regular weekly maintenance, some months require a deeper clean. The best approach includes disinfection with either a diluted bleach solution or hydrogen peroxide. These strong agents are effective for killing off microbes that thrive in humid environments. Just remember never to mix bleach with vinegar to avoid harmful reactions. Tools You Will Need Effective cleaning requires a mix of tools: a soft-bristle brush, a toothbrush for tight spaces, and cleaning agents. Both bleach and vinegar are effective, but each serves a different purpose depending on the level of cleaning required. Using distilled water further helps reduce mineral deposits and extends the time between needed cleanings. Final Tips to Maintain a Fresh Humidifier Want to keep your humidifier fresh longer? Aside from regular cleaning, consider investing in antimicrobial treatments designed to inhibit microbial growth, and always air out the tank when the device is not in use. Your lungs will thank you for maintaining a clean and efficient machine!

Terms of Service

Privacy Policy

Core Modal Title

Sorry, no results found

You Might Find These Articles Interesting

T
Please Check Your Email
We Will Be Following Up Shortly
*
*
*